Every single time I went to Back Yard I’d get that sandwich. Kind of ironic since it’s a burger place and I think I may have gotten a burger once or twice the whole time it was open. Anywho; I loved this sandwich but I didn’t love the dent it put in my wallet. It was pricy. So, I didn’t have my beloved chicken sandwich nearly as much as I’d like. But every time I did drive thru, it was guaranteed I would get that delicious chicken sandwich.
Chicken
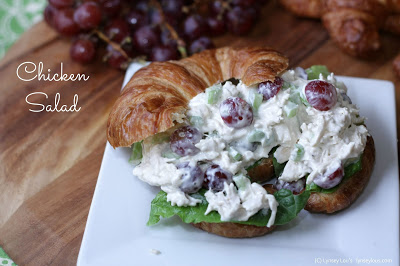
Chicken Salad
Chicken salad is one of my favorites. It’s great on sandwiches, crackers, lettuce wraps, and even by the spoonfuls. It’s easy to make and can be made in bulk to last a few days or a week…depending on how much you eat in one sitting!
It’s one of those things that’s a blank canvas and can be customized by adding as many different ingredients are as few as you like. Grab a rotisserie chicken at the store, boil your own or use leftover grilled chicken. The options are endless.
I’ve had a lot of chicken salads and I have enjoyed them all, but I’d have to say one of my favorite versions is simple. A little mayonnaise, sour cream, celery, shredded chicken, and grapes. That’s it.
The mayonnaise gives it creaminess, the sour cream adds a little tang, the grapes add sweetness and celery adds a nice crunch.
It can be thrown together in very quickly, made ahead of time and it’s one of those things that gets better as it sits. It’s great for snacking, entertaining and for weekday lunches.
I love it on croissants with a little lettuce, it’s also great in pitas, lettuce wraps, sweet bread or even on crackers.
Chicken Salad
Ingredients:
2 Cups chicken, cooked and shredded
1/3 Cup sour cream
1/3 Cup mayonnaise or Greek Yogurt
1/2 Tsp garlic powder
1 1/2 Cups grapes, cut in half
1 Stalk celery, chopped
Salt and pepper, to taste
Directions:
Combine sour cream, mayonnaise, and garlic powder in a bowl and mix to combine. Add the chicken, grapes and celery and gently stir to incorporate. Season with salt and pepper.
Serve on croissants, in lettuce cups or with crackers.
Recipe source: barely adapted from Favorite Family Recipes
BBQ Chicken Cobb Salad
It seems like as of late I’ve been sharing a lot. And I mean A LOT of sweets. Don’t get me wrong, I love my sweets and baking, it’s my therapy. But, if you had never been to the blog before and started purusing the most recent recipes you’d think we lived on sugar, sugar and more sugar.
That couldn’t be further from the truth, and honestly, I’m not sure why in the world I’ve shared so many sweet recipes back to back to back. It wasn’t planned, I promise!
So, to get things back in balance I’m sharing a non-sweet, non-dessert recipe with you today. Finally!
What better way to get things back in balance than with a salad. But not just any salad a Cobb salad. I love a good Cobb salad. But honestly, what’s not to love; some meat, lettuce, eggs, and assorted other veggies all on a bed of crispy, crunch ice cold lettuce. Yum!
Could it truly get any better? Well, I thought that answer was “no” until the other day.
That’s when I made this BBQ chicken Cobb that I spotted over on Damn Delicious. Literally minutes after seeing (and quite possibly drooling over) the picture of her salad I was in the kitchen making my own.
So, what made this particular Cobb special? Well, for starters perfectly cooked chicken, cut in chunks and tossed in bbq sauce. That’s right, bbq chicken goes on this bad boy. Also coming to the mix is fiesta corn, black beans, tomatoes, cheese, avocado, hard boiled eggs and crispy, salty bacon.
Oh my.
Now, we could stop right there. But all that deliciousness is topped with delicious, creamy and cool ranch dressing. I used my own homemade ranch (as I’m kind of partial to it) but you could most certainly use your favorite store bought dressing.
This salad was nothing short of amazing. Spencer loved his and practically inhaled his, Tucker even had his own and devoured it, so it’s safe to say this is a meal that is family friends and approved by my entire house.
BBQ Chicken Cobb Salad
Ingredients:
4 Slices bacon, cooked until crispy and crumbled
2 Boneless, skinless chicken breast (cut in half lengthwise or pounded thin)
1/4 Cup bbq sauce
3 Large eggs
6 Cups mixed green lettuce. or lettuce of your choice
2 Roma tomatoes, diced
1 Avocado, cut in half, seeded and diced (do this right before assembling)
1 Cup fiesta corn, drained
1 Cup black beans, drained and rinsed
1/4 Cup Colby-Jack cheese
Directions:
Place a large skillet over medium heat. Season chicken with salt and pepper. Place in the preheated skillet and cook, flipping once until cooked through, about 3-4 minutes per side. Remove from pan, allow to rest and cool before cutting into bite-sized pieces.
Place bbq sauce and cooled chicken in a bowl and toss to combine. Set aside.
Meanwhile, place eggs in a large saucepan. Fill the pan with water until until th eeggs are covered. Place pan over high heat and bring to a boil, cook for 1 minute. Remove from heat, cover and allow to sit for 8-10 minutes. Drain the eggs, allow to cool then peel an dice.
To assemble-
Divide lettuce between two plates or large, shallow bowls. Arrange the ingredients on the beds of lettuce in rows. Top with ranch dressing, homemade or store bought.
Recipe source: barely adapted from Damn Delicious, originally from The Kitchn
Strawberry Caprese Chicken
One of my favorite salads is Caprese salad. It’s simple, easy to throw together and it’s so incredibly versatile. Eat it alone, serve as appetizers, or even pop those ingredients on top of some chicken and wow, simply amazing.
It’s safe to say that during the summer months, when I can walk to the garden, snag a tomato and some basil we have this salad multiple times a week. Healthy and refreshing, oh, and let’s not forget that it’s topped with sticky, tangy and sweet balsamic. Yum!
I’ve been having cravings for this simple salad that screams summer, and I’ve had everything on hand that is needed to make it…except the tomatoes. Those tomatoes are kind of a key part of the salad. So, I adapted and used what I had on hand. Strawberries.
And boy, this trio didn’t disappoint. Fresh, sweet, juicy strawberries, mozzarella and basil. Oh-mah-goodness. Amazing. I could eat this stuff right out of the bowl. Um, and I did. For a second. Until I reminded myself I had other plans for it.
And those plans consisted of marinating chicken in balsamic vinegar and then baking to tender, juicy perfection. After that, then the magic happens. Topping it with this deliciously addicting salad. Then drizzling it with more of my favorite vinegar ever, balsamic!
This chicken, with prep and all takes under 45 minutes. That’s all it takes to get this perfectly delicious and simple meal from oven to table. And, it’s pretty as a picture too! Chicken topped with the bright red, green and white from the salad. It truly doesn’t get any better.
This meal is both adult and kid approved and has been requested numerous times since it was originally served.
Strawberry Caprese Chicken
Ingredients:
2 Boneless, skinless chicken breasts
1/3 Cup balsamic vinegar
3 Tbsp olive oil
1 Clove garlic, mined
For the strawberry caprese-
1/2 Cup fresh strawberries; diced
6-7 Leaves basil, rolled up and sliced
1/4 Cup fresh mozzarella, cubed
Drizzle of olive oil, optional
Drizzle of balsamic
Directions:
Place chicken, balsamic vinegar, oil and garlic in a plastic bag. Toss and move chicken around to coat. Place in refrigerator and allow to marinate for at least 10 minutes or up to 2 hours.
Preheat oven to 325. Remove chicken from bag and place in a pan sprayed with non-stick cooking spray. Pour a little of the marinade over the chicken and place in the preheated oven. Bake for 25-35 minutes, until cooked through and juices run clear when cut. Remove from oven, tent with foil and allow to cool for about 5 minutes.
For the caprese-
While the chicken is marinating combine the strawberries, basil and olive oil, if using and stir to combine. Cover with plastic wrap and place in the refrigerator until ready to serve.
Once the chicken has finished baking, remove the strawberries from the fridge, add mozzarella and toss to combine.
Place the chicken on the plates, top with strawberry mixture and drizzle with balsamic dressing. Serve and enjoy.
Recipe source: A Lynsey Original
Winger’s {Very} Sticky Fingers
Chicken. It’s one of my go to proteins. My whole family loves it and it’s so versatile. We love chicken all sorts of ways, but there’s nothing that infatuates me more than chicken coated and dripping with sticky sauce.
Before a few weeks ago I had never heard of Wingers. Apparently it’s a restaurant that’s extremely popular on the west coast. While Wingers has an large menu with options that would suit anyone’s cravings, they are best known for their wings and sticky fingers.
I’ve never tried their infamous wings or fingers, but if copying is one of the best forms of flattery then there must be something to say about their sticky fingers. I was perusing chicken recipes on Pinterest when I saw a picture of breaded chicken fingers oozing is sticky, spicy sauce.
I wanted to dive face first in that picture and devour those chicken fingers. An added bonus, as if there really needed to be any bonus, they were drizzled in ranch. Two of my favorite things together in this one picture. I quickly clicked on one of the many pictures of these chicken fingers to figure out what this chicken was all about.
It didn’t take me long to figure out I needed these in my life, as well as start wondering why Winger’s is just on the west coast. We love deliciously, sticky, sauce chicken here in the south! Not to mention complimentary popcorn as an appetizer. Anywho, if I can’t run to a Winger’s and indulge then making them at home is the next best thing.
All I have to say about these fingers is “where have you been all my life?”. Juicy, crispy baked chicken strips tossed in a sticky, sweet and spicy sauce. The sauce is a mix of brown sugar, garlic powder and Frank’s hot sauce. The perfect amount of spicy that’s quickly cut by the sweetness of brown sugar. How could you possibly go wrong with that mix?
Plus, if the thought of sticky fingers isn’t enticing enough, there’s also the fact they they are served with a side of cool ranch dressing. How could anyone resist the urge to dunk chicken fingers in ranch dressing before indulging?
You’re 30 minutes away from your newest addiction. Go ahead, you know you want some!
Winger’s {Very} Sticky Fingers
Ingredients:
For the chicken-
3-4 Chicken boneless, skinless chicken breasts, pounded to a 1/2 inch thickness
1/2 Cup flour
3 Eggs
2 Tbsp water
1 Cup panko bread crumbs
For the sauce-
1 Cup light brown sugar
1/3 Cup Frank’s hot sauce (more or less to taste)
1/2 Tsp garlic powder
3 Tbsp water
Directions:
For the chicken-
Preheat oven to 425. Line a baking sheet with foil and spray liberally with non-stick cooking spray.
Slice the chicken breasts into strips. Place chicken strips and flour to a large ziploc bag. Seal and toss until chicken is coated entirely. Place the panko in a shallow bowl. In a separate bowl add the eggs and water and whisk to combine. Dip the flour coated chicken into the egg mixture then toss in the panko to coat. Place the coated chicken on the prepared baking shett and continue with the remaining chicken. Spray or brush the breaded chicken with canola or olive oil.
Place the chicken in the preheated oven and bake for 15-20 minutes, until chicken is browned and cooked through.
For the sauce-
While the chicken is cooking prepare the sauce.
Place the brown sugar and hot sauce in a medium saucepan over medium heat. Leave on heat and stir continuously until the sugar has melted and mixture begins to bubble. Remove from heat and add garlic powder and water and stir until smooth.
Once the chicken has finished cooking, toss in the sauce. Serve warm with ranch or blue cheese dressing, if desired.
Recipe source: barely adapted from Crem De La Crumb, originally from Six Sister’s Stuff
Bruschetta Baked Chicken
Bruschetta. It’s one of those things that’s so incredibly simple but so amazing. It’s fresh, packed full of flavor and well, spoon some of it on a lightly toasted baguette and good grief. It’s darn right delicious.
Any time I come across the stuff, I must have it. I mean, I could honestly eat my weight in the stuff and not feel one ounce of guilt.
While I love it on a simple piece of bread, because what’s not to love. Carbs topped with juicy tomatoes and basil. I’m certainly not apposed to trying it on other things. Like say, crispy, parmesan encrusted chicken!
And that’s what I’ve done here. Coated chicken in a breadcrumb parmesan mixture and baked it. Placed it on a bed of pasta and topped it with the bright, fresh bruschetta. This meal was nothing short of amazing.
It’s an easy meal to throw together, which means it’s perfect for a weeknight. It’s light and refreshing, and honestly aside from it being dipped in butter before coating it’s a pretty healthy meal especially if you use wheat pasta.
This is a crowd pleaser for my entire family. Even Tucker scarfed it up before I even had the chance to ask what he thought. My only regret, that I didn’t make more bruschetta because I had to practice restraint to ensure there was enough to top everyone’s chicken.
This meal was perfect. One of those that fills you up but doesn’t leave you weighed down once you’re finished. Making it ideal for spring and summer. I can’t wait to make this again, and hopefully with tomatoes from our garden!
Bruschetta Baked Chicken
Ingredients:
3/4 Pound angel hair pasta
1 1/2 Pounds chicken tenders
1 Cup Italian bread crumbs
3/4 Cup shredded parmesan cheese
1/4 Cup grated parmesan cheese
1/4 Tsp garlic powder
Salt and pepper, to taste
1/4 Cup butter, melted
For the bruschetta:
5 Medium tomatoes, diced
1 Small clove garlic, grated
20 basil leaves, chopped
Salt and pepper, to taste
1 Tbsp olive oil
1 Tbsp balsamic vinegar, optional
Directions:
Bring a large pot of water to a boil. Salt liberally and cook pasta according to package instructions until al dente. Drain and set aside.
Preheat oven to 375. Spray a 9×13 glass pan with non-stick cooking spray and set aside.
Combine the bread crumbs, cheeses, garlic powder and salt and pepper in a shallow dish. Whisk to combine and set aside.
Rinse and dry the chicken well.
Dip the chicken in the melted butter, then transfer to the bread crumb mixture and coat. Place in the prepared pan. Repeat with remaining chicken. Place the chicken in the preheated oven and bake for 15-20 minutes, until cooked through and golden brown. (I turned the broiler on the last 2-3 minutes of cooking to get the coating crispy, this step is completely optional)
While the chicken is cooking, make the bruschetta.
Combine tomatoes, garlic, basil, salt, pepper, olive oil and balsamic vinegar in a medium bowl and stir to combine. Taste, adjust seasonings if necessary. Place in the refrigerator until the chicken is ready.
To assemble-
Place the pasta on a plate, top with chicken and then bruschetta. Serve.
Recipe source: barely adapted from Lauren’s Latest
Slow Cooker Honey Mustard Chicken
I am a condiment loving girl. Always have been. Always will be. I’ve never met a sauce I didn’t like, but I’d have to say honey mustard ranks pretty high up there on my list. So, to say I was excited when I saw this chicken from Lauren’s Latest would be an understatement.
A chicken that is cooked in one of my all-time favorite sauces and uses one of my favorite kitchen tools for the cooking process. This is definitely a recipe is right up my alley. What’s not to love? Simply combine a few simple ingredients and throw it in the slow cooker. And viola!
Another thing that is truly appealing about this recipe, as if I needed anything else. This is a freezer friendly meal. Combine uncooked chicken and the sauce in a freezer bag, seal and freeze. This simple, yet amazing meal is ready and waiting whenever you decide you want it.
One of my favorite honey mustard’s is from a local restaurant, and through trial and error I’ve created a recipe that’s pretty darn close. My favorite recipe has a lot of honey with a little yellow mustard that adds some tang, some Dijon mustard and a little whole grain mustard. So, all of the mustards are covered in this particular recipe. But I love it, it’s got so many layers of flavor and the mustards aren’t overwhelming at all.
So, I’ve slightly adapted Lauren’s recipe so I could have the tastes of my favorite honey mustard. To me there’s nothing better than dunking a chicken nugget or chicken strip in a big bowl of honey mustard, and this slow cooker honey mustard chicken does all the dunking for you. Sticky honey, tangy mustard and buttery, tender chicken.
Slow Cooker Honey Mustard Chicken
Ingredients:
2 Chicken breasts (about 1 lb)
1/2 Medium onion, diced
1 Clove garlic, minced
3/4 Cup honey
1/4 Cup dijon mustard
2 Tbsp yellow mustard
2 Tbsp whole grain mustard
2 Tbsp unsalted butter
Salt and pepper, to taste
Chives, optional
Directions:
*Combine honey and mustards in a bowl and whisk to combine. Add the onion and garlic and stir. Place the chicken in the slow cooker and pour the honey mustard mixture over the chicken. Turn the chicken to coat. Add the butter, cover and cook on high for 3 to 4 hours, or until chicken is fully cooked.
Remove the cooked chicken, shred and return to sauce. Keep warm until ready to serve. Stir in chives if desired.
Serve over rice.
*For a freezer meal, simply combine all the ingredients except chives, in a freezer bag. Seal the bag and place in the freezer. When ready to cook, remove the chicken and allow to thaw, then place in the slow cooker.
Recipe source: barely adapted from Lauren’s Latest
White Bean Soup
During the cooler months I probably make soup at least 2 to 3 times a week. To me, there’s just nothing better than a steamy bowl of soup on a chilly day. My list of soups to try grows daily. At the rate I’m adding recipes I’ll be able to try everything in about…oh, 2 to 3 years!
But that doesn’t stop me from scrolling through pinterest, purusing magazines, and scouring the internet for drool-worthy recipes. One of those irresistible recipes I recently came across was from Chef In Training and it immediately went to the top of my list.
White bean soup. The picture instantly drew my in; a big crock of creamy soup topped with melted cheese and a piece of buttery, crispy bread. I wanted to face dive in the picture and devour that bowl. If it was possible, I would have done just that. But, since diving through a screen isn’t in the cards I decided to do the next best thing. Make my own.
Folks, this white bean soup is everything I imagined and more. A creamy, cheesy soup packed with various spices, chilies, chicken and beans. Not only is this soup amazing and packed with tons of flavor, it’s so quick and easy to make. In about 20 minutes this soup goes from stove top to table. Making this rich, hearty soup ideal for those busy weeknights.
White Bean Soup
Ingredients:
1 Tbsp olive oil
1 Medium onion, chopped
2 cloves garlic, minced
1 (4 oz) can chopped green chilies
2 Tsp cumin
1/8-1/4 Tsp cayenne pepper
2 (15.5 oz) cans white beans, drained and rinsed
2 Cups cooked chicken, chopped
3 Cups chicken broth
1 1/2 Cups grated Monterey Jack cheese
1 Cup sour cream
Directions:
Place a large sauce over medium heat. Add onions and saute until tender, about 3-5 minutes. Add garlic, chilies, cumin and cayenne pepper and stir to combine, saute for 2 minutes. Add beans, chicken and broth and bring to a boil. Remove from heat, add cheese and stir until cheese is melted. Add sour cream and stir until smooth.
Recipe source: Chef in Training, originally from Taste of Home
Garlic Butta Hot Wings
First of all I have to say sorry. Sorry I’ve been MIA for the passed week and half. We’ve had a lot going on the past several weeks and unfortunately the ol’ blog has been neglected. We vacationed at the beginning of the month, we got back and it was time to prepare for Thanksgiving and my monthly news segment and on top of that we just had to get back in routine and deal with the regular day to day stuff. It feels like we jumped straight from August to December and I’m not quite sure where the other months have gone. Does anyone else feel my pain?
December isn’t going to much easier. We’ve put Christmas decorations up. Yay! Trying to get shopping completed, plan and prepare for Tucker’s 5th birthday. Where has the time gone? We have to get ready for Christmas programs, family coming to town and bake cookies for the jolly ol’ big guy.
So, I’ve been overwhelmed with everything that’s had to be done and I’m getting overwhelmed just thinking about everything else that needs to be done and I haven’t had time to sit down and share any recipes with you guys. I’ve cooked, taken pictures and written recipes but that’s as far as I’ve gotten. So, before you all disown me and move on I wanted to come over here and give you a brief summary of what’s been going on in the world of Lynsey Lou’s and share an amazing recipe with you.
Wings. Anytime is a good time for wings, but wings and football go hand in hand. If football is on t.v. then a big platter of wings must be present. We have a favorite wing place in town, but since I’ve started making baked wings at home Spencer’s requested them more than the one’s from the restaurant. He actually prefers my wings over the ones from the restaurant.
And frankly, that’s a big ol’ W for me. I love making wings and playing around with the different flavors. Also, they are baked making them a little more healthy than the fried version from the restaurant so there’s not as much guilt! So, since he’s such a fan of the baked wings he was psyched when I told him about a new recipe I wanted to try.
Garlic butta baked wings. My mouth was watering after reading just the garlic butta part. I’m a sucker for garlic butter, so the fact that some wings are tossed in a big bowl if it was right up my alley. These wings were amazing. They are baked but they are still juicy and have that crispy exterior we are all accustomed to. They are coated in a dry rub and chilled to allow the spices to meld. Then they are placed in a hot oven and baked to crispy, juicy perfection. After cooked through they are tossed in that yummy garlic butter.
These wings are on the spicy side. I edited the recipe slightly to tame the heat a little. We love spice, but the original recipe was even a little too hot for us However, if you want the full heat click the link below to obtain the original recipe.
So this Sunday when you sit down to enjoy some football, be sure you have a plate of these garlic butta wings near by. They would also make a great addition to your Super Bowl spread. It’s never too early to start planning that menu!
Garlic Butta Hot Wings
Ingredients:
For the wings-
1 Tbsp granulated garlic
1 Tsp cayenne pepper
1 Tbsp mustard powder
1 1/2 Tsp freshly cracked pepper
1/4 Tsp ground white pepper
2 Tsp cumin
4 Pounds chicken wings
For the sauce-
2 Tbsp extra virgin olive oil
1 Tbsp mined garlic, approximately 2 cloves
1 (12 oz) bottle hot sauce
4 Tbsp unsalted butter
1 Tbsp white vinegar
1 Tbsp lime juice
Directions:
In a large bowl combine granulated garlic, cayenne pepper, mustard powder, black and white pepper and cumin and whisk to combine. Remove 1 1/2 tablespoons of spice mixture for the sauce.
Rinse the wings and pat dry. Place in the bowl with the remaining spices and toss to coat. Lay the wings, in a single layer, on a baking sheet and cover loosely. Place in refrigerator for 1-2 hours.
For the grill-
Preheat grill to medium high. Place wings on the hot grill, turning, until they are crispy, about 20-25 minutes. Transfer to the cooler side of the grill, turning frequently, until cooked through, about 8-10 minutes.
Toss wings in the sauce and serve immediately.
For baked wings-
Place a wire rack on a rimmed baking sheet. Lay the wings in a single layer and place in a 375 degree oven. Cook for about 45 minutes, turning once, until cooked through and crispy. Remove and toss with sauce.
For the sauce-
Place a medium saucepan over medium-high heat. Add olive oil and garlic and saute about 30 seconds, stirring constantly. Add the reserved spice mixture and hot sauce. Bring to a simmer, add butter, vinegar, and lime juice and stir until the butter melts. Keep warm until ready to serve.
Recipe source: barely adapted from Food Network Magazine, Guy Fieri
Slow Cooker Chicken Enchilada Chili
It is FINALLY feeling like fall here in Arkansas and I am so stinkin’ excited! While I thoroughly enjoy grilling, eating lighter and refreshing foods, I am so ready for the fall and the soups, stews and other hearty meals that go along with it.
When I saw the forecast last week. Yes, I plan my menu according to the weather. Please tell me I’m not the only one who does that.
Anyway, so I got the first true glimpse of fall-like weather in the forecast and immediately starting skimming my soup recipes I had marked over the past few months. Chili? Stew? Chowder? Decisions decisions.
I finally decided to make this chicken enchilada chili from Sweet Treats and More. Have you visited her site? If not, I strongly urge you to head over and check out all of her tempting treats!
Anyway, back to the soup. Not only is it Mexican inspired, which you all know I live on Mexican food. It’s also easy prep, low fuss and uses one of my favorite kitchen tools, the slow cooker.
This is one of those meals you can literally chunk everything (even frozen chicken breasts) in the slow cooker in just minutes, ensuring you won’t be late heading out the door to work! It includes a few simple and basic ingredients that are probably in your pantry right now, meaning no special trip to the store! When you get home it’s just a matter of removing the chicken, shredding it and returning it to the soup.
This chili is everything you want in a hearty fall meal. Tender chicken, beans, tomatoes, green chiles and enchilada sauce. It’s amazing on it’s own, but I topped it with some fresh avocado, cilantro, a dollop of sour cream and of course, shredded cheese, and a little squeeze of lime juice. Oh my gosh folks, this soup is amazing.
It’s thick and hearty but it’s bursting with big flavors. It’s got the taste of a soup that you’ve spent all day on…but no one has to know you spent a matter of minutes opening cans and pouring them in the slow cooker. If you haven’t had your ceremonial first bowl of chili this year, it’s time. And, I urge you to make this chili as your first batch of the season!
Slow Cooker Chicken Enchilada Chili
Ingredients:
2 Large or 3 Medium Chicken breasts, frozen or thawed
2 Cans white beans, drained and rinsed
1 Can Rotel*
1 Can stewed tomatoes with peppers and onions
2 (10oz) Cans enchilada sauce*
1 (4oz) Can green chiles
1 Tsp cumin
1/2 Tsp garlic powder
1/2 Tsp salt
1 1/2 Tsp taco seasoning
1/2 Cup milk
Directions:
Combine everything but beans and chicken in the slow cooker and stir to combine. Add the beans, and stir to incorporate. Add the chicken, and submerge in the mixture. Turn the slow cooker on low and cook for 6-8 hours or low for 3-5 hours.
Once the chicken is cooked through, remove and transfer to a cutting board. Using 2 forks, gently pull the chicken apart to shred. Return to the slow cooker and stir to combine.
Serve with chips or corn bread, sour cream, sliced avocado, lime juice and cilantro, if desired.
*To ensure this chili is ideal for the entire family, use mild Rotel and mild enchilada sauce.
Recipe source: slightly adapted from Sweet Treats and More